Eyecandying Android app's splash screen with animations
Usually when you see an animated splash screen tutorial for Android it shows how to build a splash screen that takes some (or a lot) of user's time just to show a cool animation app developers built without any particular reason.
This article shows how to add an animation to seamlessly land your user from your static splash screen on your app's first screen. It's not only adding an animation to your app but showing app content by going "through" the splash screen. User may have a feeling of entering your app's gates. A good example where this animation can be used is a first time use when onboarding a new user.
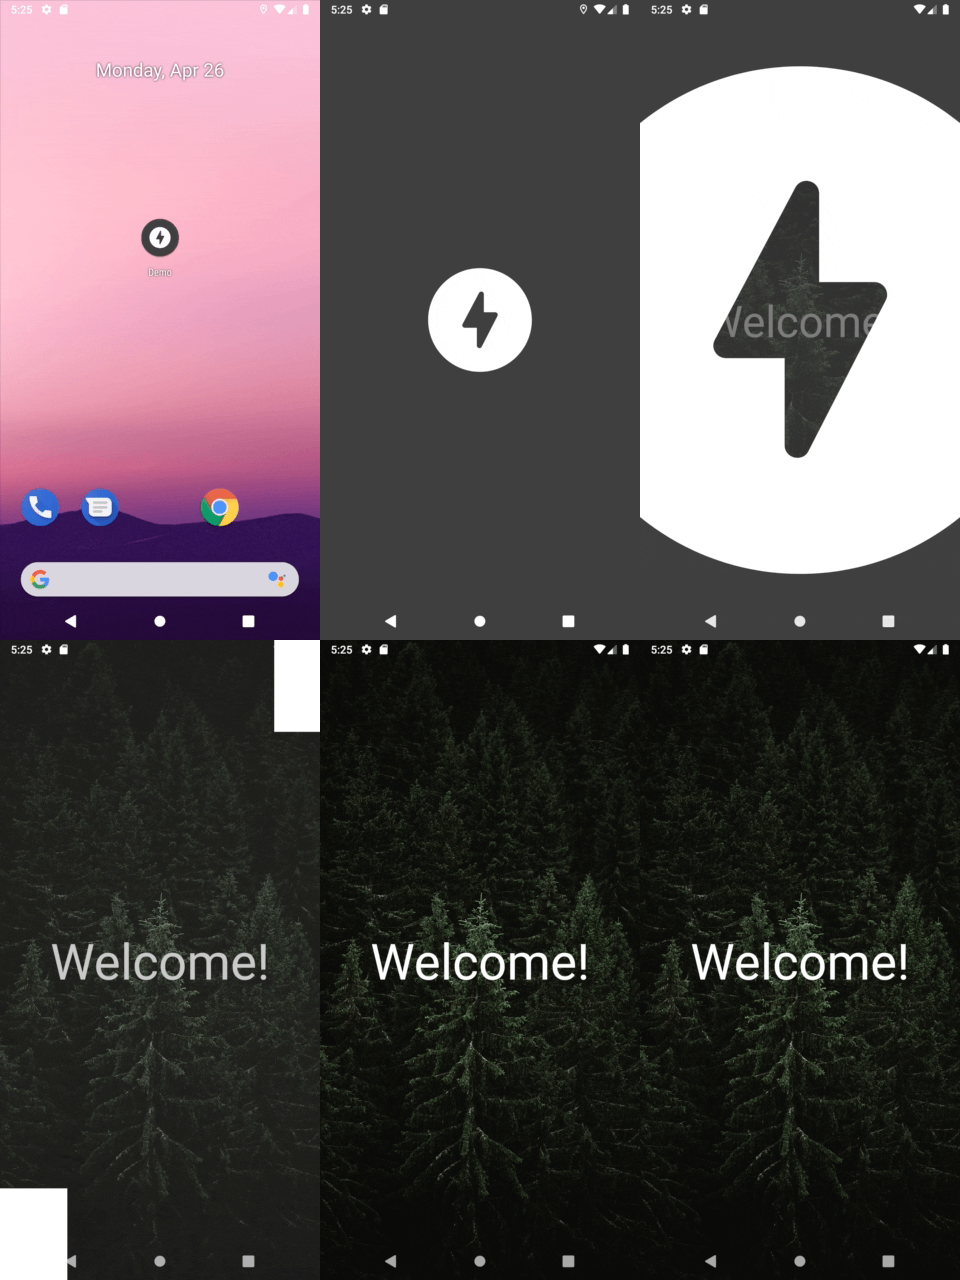
A short GIF is worth a thousand words:

Things to note in the video above:
- Splash screen is displayed immediately after app start. There's no blank screen between clicking the app icon and showing the actual content
- Time before animation starts is the time that the operating system needs to show first app's screen with the actual content
- Splash screen has a very simple and quick animation to show first screen of the app with the actual content.
With great power comes great responsibility: it's easy to ruin user experience by building something useless. Don't waste user's time and think twice when building something like this.
Here's a step by step diagram:

The trick is to seamlessly change static splash screen to an activity with the actual content. The steps are:
- Have a properly implemented splash screen (read what "proper" means below)
- Open main app activity as soon as possible without activity transition
- Have a special overlay view placed in the main activity that is perfectly aligned with splash screen's image. This overlay view shows the actual animation. The animation can be done using Android's animation framework but I preferred a lower level animation so there was more control over the animation.
Next sections share some of the implementation details but there's nothing special about it. Standard components are used and things are done in standard ways. Complete example is available on Github.
1. Build a proper static splash screen
Building a proper splash screen is easy. "Proper" in this case means:
- being able to be shown immediately after user clicks the app icon
- not doing any heavy processing: no database queries or network requests.
Building a splash screen like this has been covered many times in other articles. For example,
this article
can be used as a tutorial. The implemented splash screen is so lightweight it doesn't even call
setContentView().
This splash screen works extremely good itself without even building what's being built in this article.
It looks especially good when it matches app icon's background and icon as Android is showing an icon-to-app startup animation out of the box. Launchers behave differently so app-to-icon animation may not work on some devices. You know, things are different on Android ¯\_(ツ)_/¯
2. Seamlessly open MainActivity
In this section by
SplashScreenActivity
and
MainActivity
I mean Android activities for the static splash screen and the first screen with actual app content.
SplashActivity
is seamlessly changed to
MainActivity. User is not able to say when a new activity is opened because both activities look exactly the same: same background color, same logo size, same logo position. First frame of
MainActivity's animation must match how
SplashScreenActivity
looks. Achieving seamlessness is easy:
-
There's an overlay view placed on top of everything in
MainActivity. This view draws logo, background and animates them when time comes. It's the key part of the seamless transition -
Disable animated transition between
SplashScreenActivityandMainActivityso it's visually impossible to see when next activity is displayed:
// SplashScreenActivity.kt
startActivity(Intent(this, MainActivity::class.java))
overridePendingTransition(0, 0)
finish()
User lands on a regular activity with a layout - there's full control over what's displayed and how it's animated. I personally like to use short scale and alpha animations to transition between splash screen's logo and actual app content.
Using vector graphics for animated logo is important as the scaled logo's edges should look sharp when scaled many times. I'm using Android's vector drawable converted to
Path
as shown in [my previous post]({% post_url 2021-01-29-android-xml-as-path %}). I ended up using a custom view with a
Path
after several attempts using other features of the framework:
- Shared element transition is not really suitable and hardly customizable
-
Scaling vector drawable with
scale()is not working well either due to bounds issues when animation can't go outside bounds.
Notes
-
I like building apps with edge to edge design so animation is going to infinity and beyond and nothing can stop it (status and navigation bars in particular).
-
Complete code example is available on Github. Key files:
-
SplashScreenActivity- very simple splash screen with a background and a logo. Simply starts main app activity fromonCreatewithout inflating a layout -
MainActivity- activity for showing app content, takes part in seamless transition from splash to content by hosting an overlay view -
SplashView- an overlay view used for seamless transition between splash screen and main activity and for animating the splash screen.